Poco ポコ

A cross-engine UI automation framework. Unity3D/cocos2dx-*/Android native APP/iOS native APP/(Other engines SDK)/…
示例(Example)
首先请把usb线连上Android手机并打开 adb调试模式 。
# coding=utf-8

import time
from poco.drivers.unity3d import UnityPoco

poco = UnityPoco()

poco('btn_start').click()
time.sleep(1.5)

shell = poco('shell').focus('center')
for star in poco('star'):
    star.drag_to(shell)
time.sleep(1)

assert poco('scoreVal').get_text() == "100", "score correct."
poco('btn_back', type='Button').click()
更多的例子请移步 More examples. 网易自研引擎项目请参考 网易游戏项目测试脚本标准模板 来开始建立回归测试工程。
编写脚本专用工具(Tools)
获取界面中的UI元素和开始编写脚本,请使用我们专门为您打造的 AirtestIDE 或轻量级的检视器 PocoHierarchyViewer 。 网易自研引擎 请直接使用 Hunter内嵌inspector .
安装(Installation)
在电脑上安装poco,并把poco-sdk集成到游戏里
直接pip安装即可,名字叫 pocoui
pip install pocoui
SDK集成(Integration)
把sdk集成到游戏里请参考 Integration Guide 。 网易自研引擎 无需嵌入sdk,请在hunter上直接配置,见 Integration Guide for NetEase
特性(Features)
支持包括Unity3D, cocos2dx-*等主流引擎,也支持android/iOS原生应用
在游戏运行时获取UI元素和层次结构(hierarchy)
超快,不影响游戏性能
5分钟完成就可以安装集成好
提供了强大的引擎无关API
支持多点触控 fling/pinch/…
支持gps、加速度感应器等模拟输入
可以很方便地扩找到私有引擎中使用
python 2/3兼容
文档(Documentation)
Use poco on platforms/engines
This section guide you how to start to use poco to write your test cases on different platforms/engines.
入门教学用例(Tutorials and examples)
This section will let your know all basic features of poco.
如何使用(How to use Poco)
根据你所使用的引擎,按对应的方式初始化Poco实例。请先将Android手机连上电脑并启动好游戏/App,或者直接启动windows版并且不要让游戏后台运行。
下面例子列出几种常见引擎的初始化方式
Unity3D.
from poco.drivers.unity3d import UnityPoco

poco = UnityPoco()
# for unity editor on windows
# poco = UnityPoco(('localhost', 5001), unity_editor=True)

ui = poco('...')
ui.click()
Android native APP
from poco.drivers.android.uiautomation import AndroidUiautomationPoco

poco = AndroidUiautomationPoco()
poco.device.wake()
poco(text='Clock').click()
for other engines, refer to Poco drivers for more details. If poco drivers does not support your engine, please refer to Integration Guide.
使用Poco选择UI对象
基本选择器(Basic Selector)
在poco实例后加一对括号就可以进行UI选择了。选择器会遍历所有UI,将满足给定条件的UI都选出来并返回。
括号里的参数就是所给定的条件,用属性名值对表示,其中第一个参数固定表示 节点名 其余可选参数均表示节点的属性及预期的属性值。下面的例子中可以感受一下选择表达式究竟是怎么样的。更详细的使用请参考 API Reference selecting UI
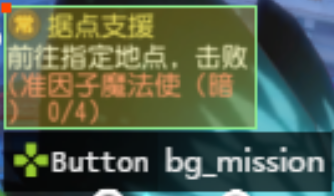
# select by node name
poco('bg_mission')

# select by name and other properties
poco('bg_mission', type='Button')
poco(textMatches='^据点.*$', type='Button', enable=True)
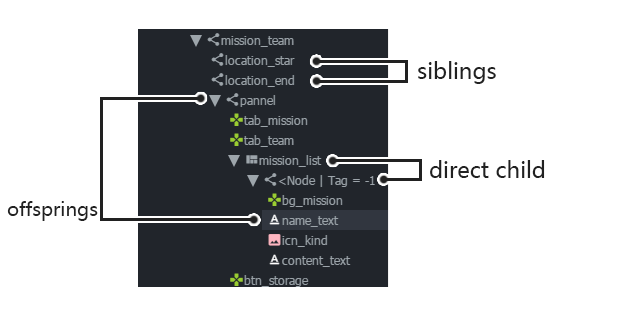
相对选择器(Relative Selector)
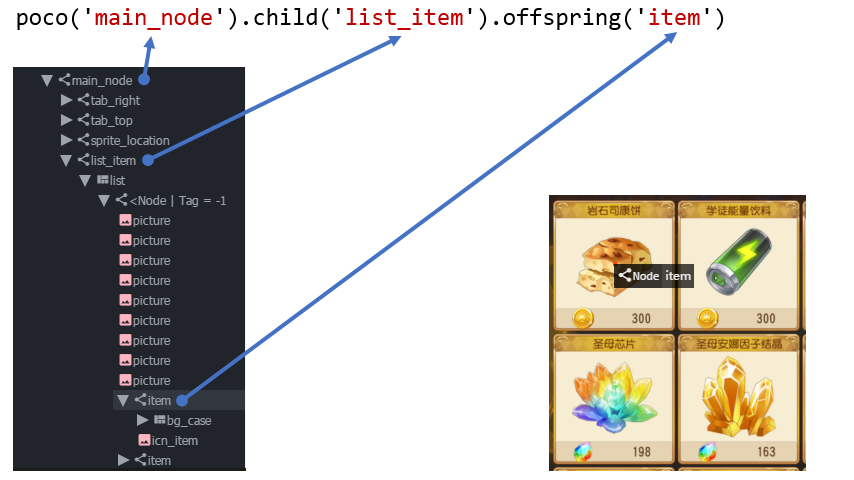
直接用节点属性没法选出你所想要的UI时,还可以通过UI之间的渲染层级关系进行选择,例如父子关系、兄弟关系、祖先后代关系。
# select by direct child/offspring
poco('main_node').child('list_item').offspring('item')
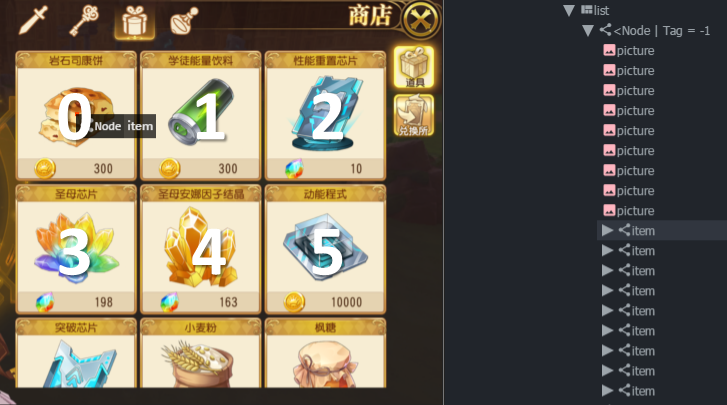
空间顺序选择器(Sequence Selector)
按照序号(顺序)进行选择总是按照空间排布顺序,先从左往右,再像之前那样一行一行从上到下,如下图中的数字标号,就是索引选择的序号。索引选择有个特例,一旦进行选择后,如果UI的位置发生了变化,那么下标序号仍然是按照选择的那一瞬间所确定的值。即,如果选择时1号UI现在去到了6号的位置,那么还是要用 poco(...)[1] 来访问,而不是6.如果选择了之后,某个UI消失了(从界面中移除或者隐藏了),那么如果再访问那个UI则可能会发生异常,其余的UI仍可继续访问。
items = poco('main_node').child('list_item').offspring('item')
print(items[0].child('material_name').get_text())
print(items[1].child('material_name').get_text())
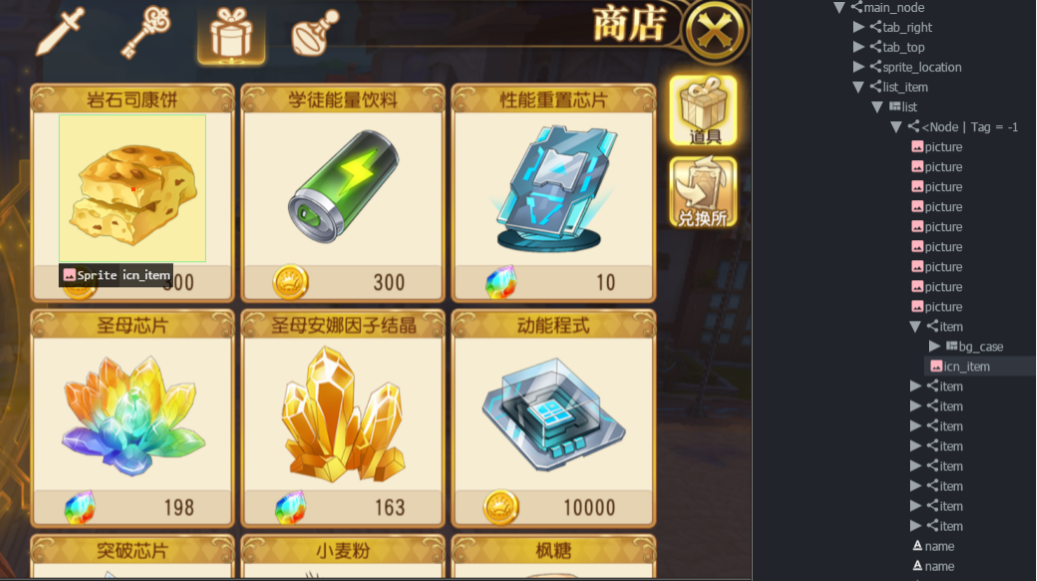
迭代一组对象(Iterate over a collection of objects)
下面代码片段展示如何迭代遍历一组UI
# traverse through every item
items = poco('main_node').child('list_item').offspring('item')
for item in items:
    item.child('icn_item')
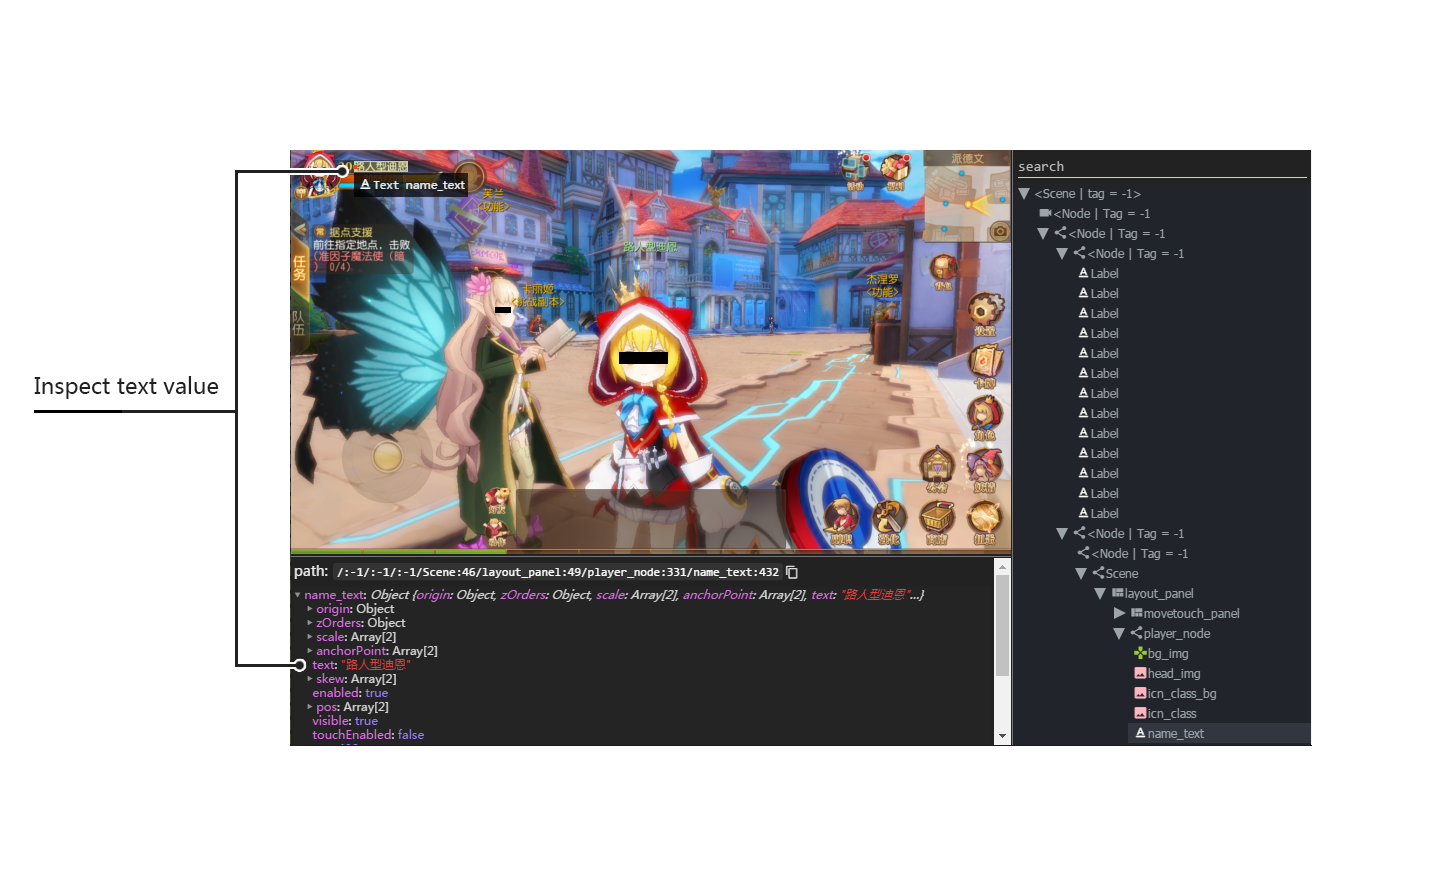
读取属性(Get object properties)
下面的例子展示如何通过代码获取UI的各种属性
mission_btn = poco('bg_mission')
print(mission_btn.attr('type'))  # 'Button'
print(mission_btn.get_text())  # '据点支援'
print(mission_btn.attr('text'))  # '据点支援' equivalent to .get_text()
print(mission_btn.exists())  # True/False, exists in the screen or not
操作UI对象(Object Proxy Related Operation)
下面就是一些UI常规的操作方法
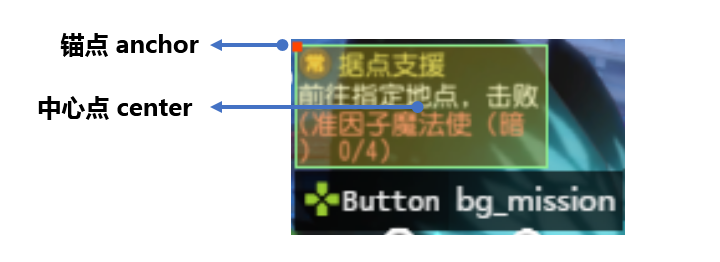
点击(click)
点击默认点在 anchorPoint 上,每个UI都会有一个 anchorPoint ,也就是检视器(Inspector)中UI包围盒的那个红点,大部分情况下 anchorPoint 都在UI包围盒的正中央。如果想指定其他的点击位置,可以传一个参数到 click 方法中,这个参数是一个用list或tuple表示的2维向量,其 [x, y] 值分别表示相对于包围盒左上角的偏移量,左上角为 [0, 0] ,右下角为 [1, 1] ,具体用法请见 局部坐标系 。
下面的例子展示 click 的几种用法
poco('bg_mission').click()
poco('bg_mission').click('center')
poco('bg_mission').click([0.5, 0.5])    # equivalent to center
poco('bg_mission').focus([0.5, 0.5]).click()  # equivalent to above expression
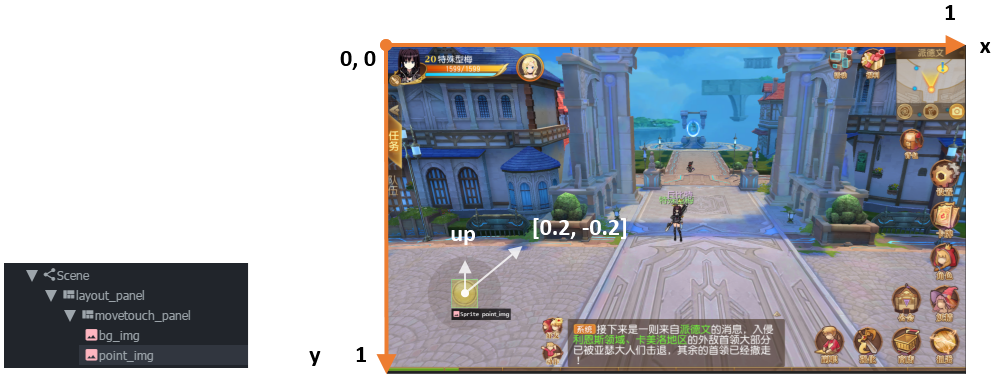
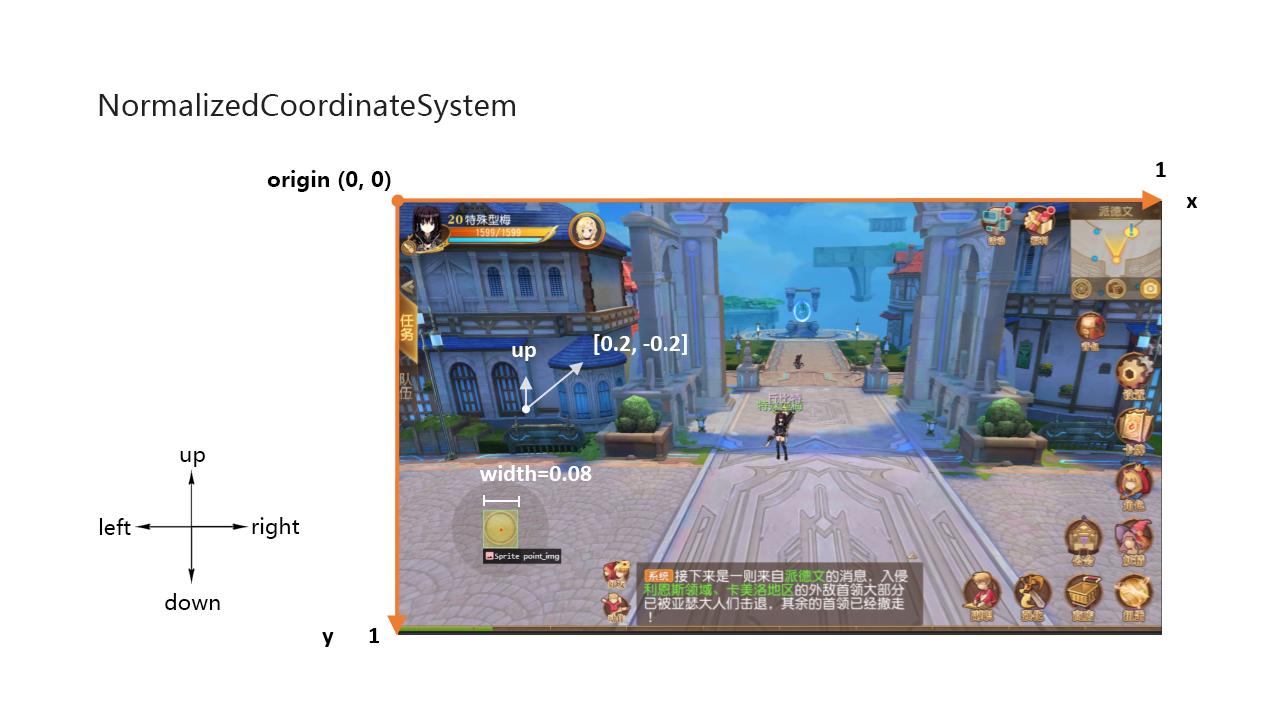
滑动(swipe)
swipe操作同样是以 anchorPoint 为起点,如果你想改变起点请使用下面的 focus 方法,然后朝给定向量所代表的方向滑动,距离也就是向量的长度。关于向量的坐标如何表示可以参考 归一化坐标系 。
下面例子展示如何使用 swipe 方法
joystick = poco('movetouch_panel').child('point_img')
joystick.swipe('up')
joystick.swipe([0.2, -0.2])  # swipe sqrt(0.08) unit distance at 45 degree angle up-and-right
joystick.swipe([0.2, -0.2], duration=0.5)
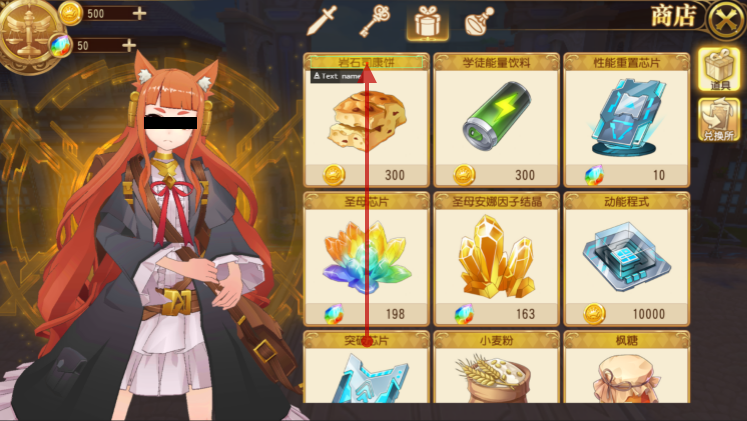
拖拽(drag)
与 swipe 不同的是, darg 是从一个UI拖到另一个UI,而 swipe 是将一个UI朝某个方向拖动。
下面例子展示如何使用 drag_to 方法
poco(text='突破芯片').drag_to(poco(text='岩石司康饼'))
局部定位(focus (local positioning))
所有UI相关的操作都默认以UI的 anchorPoint 为操作点,如果想自定义一个点那么可以使用 focus 方法。调用此方法将返回 新的 设置了默认 焦点 的UI,重复调用则以最后一次所调用的为准。focus 所使用的是局部坐标系,因此同样是UI包围盒的左上角为原点,x轴向右,y轴向下,并且包围盒长宽均为单位1。很显然中心点就是 [0.5, 0.5] 。下面的例子会展示一些常用的用法。
poco('bg_mission').focus('center').click() # click the center
将 focus 和 drag_to 结合使用还能产生卷动(scroll)的效果,下面例子展示了如何将一个列表向上卷动半页。
scrollView = poco(type='ScollView')
scrollView.focus([0.5, 0.8]).drag_to(scrollView.focus([0.5, 0.2]))
等待出现(wait)
在给定时间内等待一个UI出现并返回这个UI,如果已经存在画面中了那就直接返回这个UI。 如果超时了还没有出现,同样也会返回,但是调用这个UI的操作时会报错。类似的操作还有,见 wait_for_appearance
poco('bg_mission').wait(5).click()  # wait 5 seconds at most,click once the object appears
poco('bg_mission').wait(5).exists()  # wait 5 seconds at most,return Exists or Not Exists
全局操作(Global Operation)
在没有选定或指定UI的情况下也可以进行操作(模拟输入),也叫全局操作。
点击(click)
poco.click([0.5, 0.5])  # click the center of screen
poco.long_click([0.5, 0.5], duration=3)
滑动(swipe)
# swipe from A to B
point_a = [0.1, 0.1]
center = [0.5, 0.5]
poco.swipe(point_a, center)

# swipe from A by given direction
direction = [0.1, 0]
poco.swipe(point_a, direction=direction)
截屏(snapshot)
截屏幕并以base64编码返回。截图的格式(png, jpg, …)由对应的sdk实现决定,大多数情况下是png。详见 ScreenInterface.getScreen
Note: snapshot is not supported in some engine implementation of poco.
from base64 import b64decode

b64img, fmt = poco.snapshot(width=720)
open('screen.{}'.format(fmt), 'wb').write(b64decode(b64img))
异常处理(Exceptions)
本节说明如何处理异常
PocoTargetTimeout
from poco.exceptions import PocoTargetTimeout

try:
    poco('guide_panel', type='ImageView').wait_for_appearance()
except PocoTargetTimeout:
    # bugs here as the panel not shown
    raise
PocoNoSuchNodeException
from poco.exceptions import PocoNoSuchNodeException

img = poco('guide_panel', type='ImageView')
try:
    if not img.exists():
        img.click()
except PocoNoSuchNodeException:
    # If attempt to operate inexistent nodes, an exception will be thrown
    pass
单元测试(Unit Test)
Poco是自动化测试框架,不负责单元测试部分。如果想要进行系统地管理你的测试或编写更高级的测试代码,请参考我们的单元测试部分 PocoUnit. PocoUnit是一个提供了完善设施的专门为游戏和应用设计的单元测试框架,用法与python标准库 unittest 完全兼容。
术语解释(Some Concepts)
文档中可能会用到以下术语,在这里事先定义一下,避免误解和歧义。
Target device: test devices where the apps or games run on, it usually refers to mobile phone devices
UI proxy: proxy objects within Poco framework, they represent zero (none), one or multiple in-game UI elements
Node/UI element: UI element instances or nodes in app/game
选择表达式 :除非你需要扩展或自定义更底层的Poco的行为,一般无需关心此。选择表达式是一种框架和sdk交互的底层数据结构,用在
Selector类中。
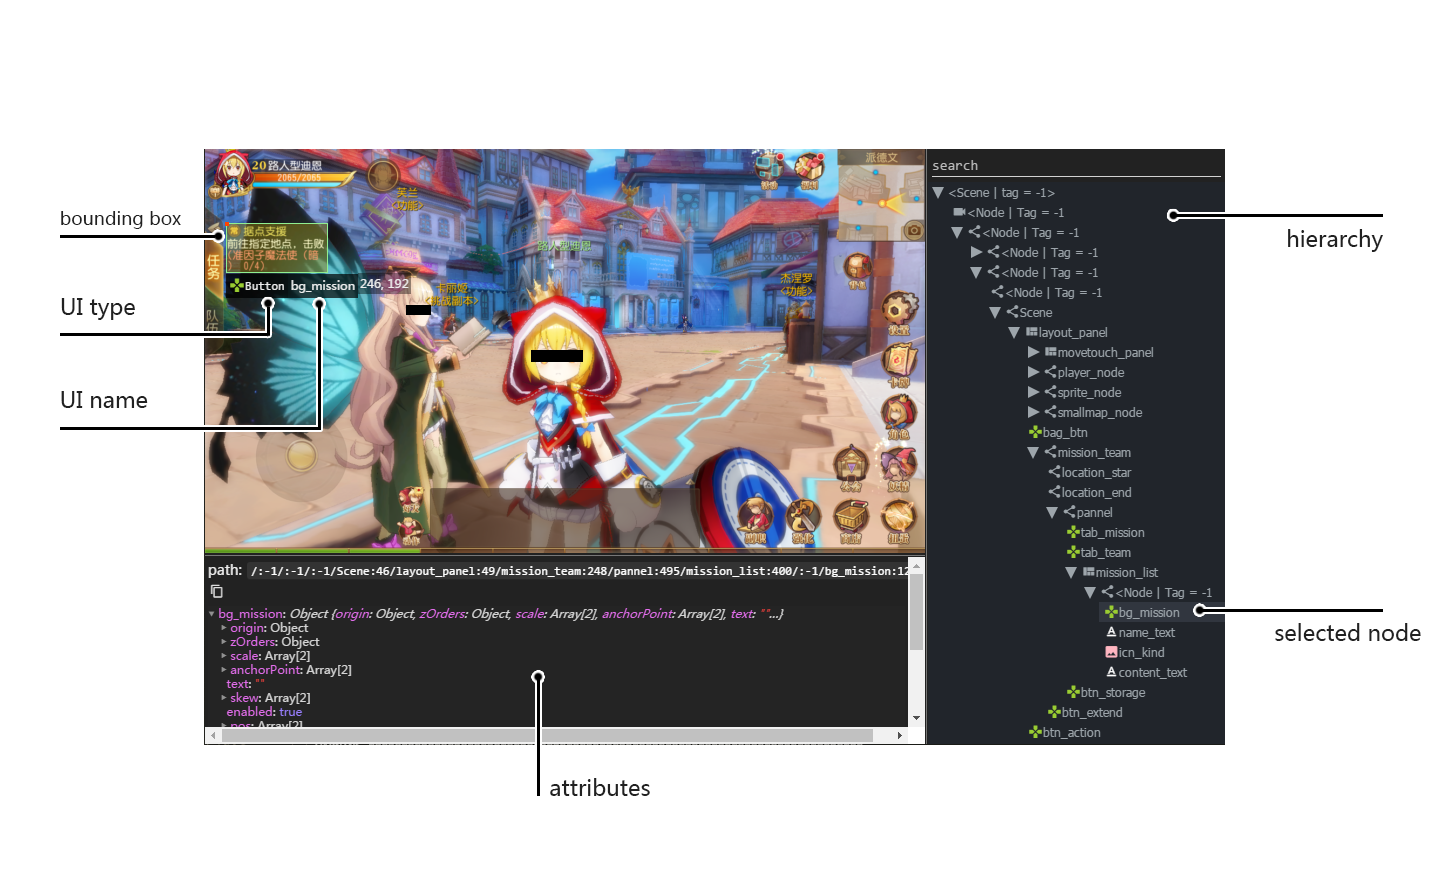
下面的几个图形象地展示在Poco中层次结构(hierarchy)和UI属性的特征,从Inspector里也能很容易地预览当前界面的UI控件。
坐标系与度量空间定义
归一化坐标系(Normalized Coordinate System)
归一化坐标系就是将屏幕宽和高按照单位一来算,这样UI在poco中的宽和高其实就是相对于屏幕的百分比大小了,好处就是不同分辨率设备之间,同一个UI的归一化坐标系下的位置和尺寸是一样的,有助于编写跨设备测试用例。
归一化坐标系的空间是均匀的,屏幕正中央一定是(0.5, 0.5),其他标量和向量的计算方法同欧式空间。
局部坐标系(Local Coordinate System (local positioning))
引入局部坐标系是为了表示相对于某UI的坐标。局部坐标系以UI包围盒左上角为原点,向右为x轴,向下为y轴,包围盒宽和高均为单位一。其余的定义和归一化坐标系类似。
局部坐标系可以更灵活地定位UI内或外的位置,例如(0.5, 0.5)就代表UI的正中央,超过1或小于0的坐标值则表示UI的外面。
Join to discuss!
Contributions
Any pull requests are welcomed! We will have the code checked carefully. Please make sure the codes are compatible with python 2/3 and have the same coding style.